Written By: Veratul
I have never attempted to write a tutorial before in my entire life. So hopefully, this tutorial will make enough sense that you can actually create your own classic-style character select screen using 2D Fighter Maker 95.
So, you want to make a classic-style character select screen, like in Street Fighter 2, in your FM95 project. Unfortunately, the engine wasn't designed to allow you to do this. Luckily, there is a way to get around this problem.
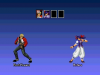
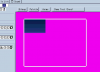
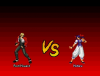
Here is what the character select screen looks like in version 0.006a of my project. I currently have two characters in the game for testing. My final project will have at least 4 original characters, maybe more, hence the two empty pic boxes. Now, to make this style of character select screen work, you should first design the background for your select screen. On this background, you will also place the character grid that you'll be selecting characters from. You could also put the grid in a separate layer, just place it directly above the background layer.
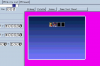
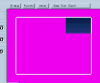
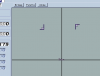
This is is my background, with character grid included.
You can make your pic boxes any shape or size you want, but the entire grid must remain near the center of the screen in order for the cursors to appear correctly, as you will see later. The area that you can use for the grid will depend on the size of the characters in your game, but you will most likely be required to keep in an area similar to what I have marked out on the picture at the right. You can place the grid anywhere between the two yellow lines, and it should work.
Now, we need to make the cursors. When you are changing characters on the select screen in FM95, the graphics that change are the standing animation of the new character, and the name picture (which is generally placed below the character). Since the cursor must also change when you pick a new character, we will place our cursor graphic on the name picture graphic. The tricky part is trying to line the cursors up with the grid on the background. This now becomes a trial and error game. Editing the picture, loading it into FM, making a game disk, testing it, editing the face picture again, and so on and so on, until the cursors line up. You must place both the first player cursor and the second player cursor on the name picture. By keeping your grid on the center of the screen, the unwanted cursor (for example, the player 2 cursor when you are player 1) is usually "drawn" off screen, so it cannot be seen.
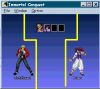
Some of your unwanted cursors, if your grid is pretty wide, will appear on the opposite edge of the screen. To remedy this, you must cover it up with another picture. You can make some sort of border, or as I did, cut a small chunk out of your background and use that to cover-up the areas that the unwanted cursors will appear. You can do this with a singe layer and picture, or two as I did, seen below.
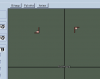
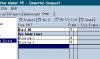
Make sure you place the blocking layers below the "Sys. Image Layer". The layers are drawn from top to bottom, so the lower layer on the list will be drawn above the higher layer on the list. The "Sys. Image Layer" is the layer that the character animation and the name picture is drawn on. So, we place our blocking pictures as shown at the left. If you have everything lined up, your cursor system will start to work!
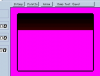
Since the same name pictures are also drawn on the versus screen, you will also have to cover them up there too. This time, you will have to be sure to cover-up every single cursor. In my project, the cursor will only appear along the top of the screen. Thus, I placed a picture in a layer above the system layer, which successfully blocks out any cursor that might appear. Lined up, the cursors are blocked, and you get your beautiful versus screen, free from pesky cursors!
Put these cursors on all of the characters in your game, line them up, and booyah! You have a classic-style character select screen. Be sure that you place the faces on your grid in the same order that your characters are in. Unfortunately, if you have multiple rows in your grid, you cannot move down the grid like you can in a real select screen. You still select your character by pressing left or right. Pressing up or down only changes the color palette for the character. You can simply have the cursor wrap around to the next line when you reach the edge of the grid.
Well hopefully that made some sense. Have fun with your projects! I hope this tutorial was useful to you.


 RPG Crisis > Tutorials/Scripts > Tutorials > 2D Figher Maker 95 > Create A Classic Style Character Select Screen